

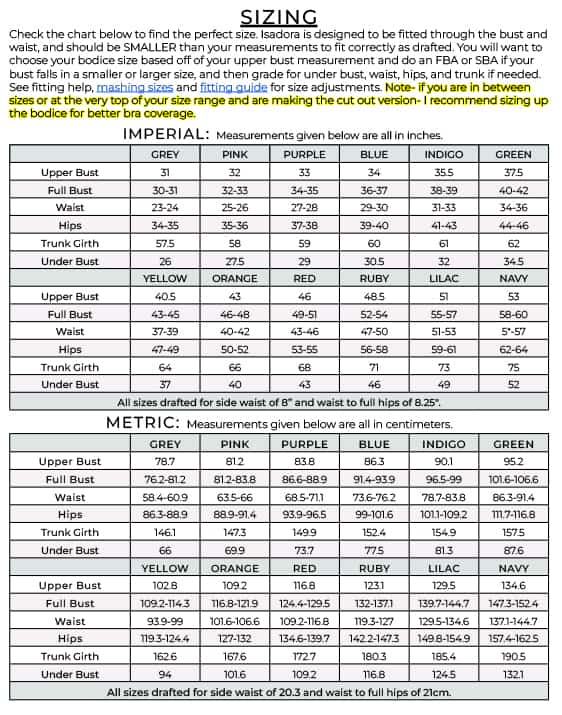
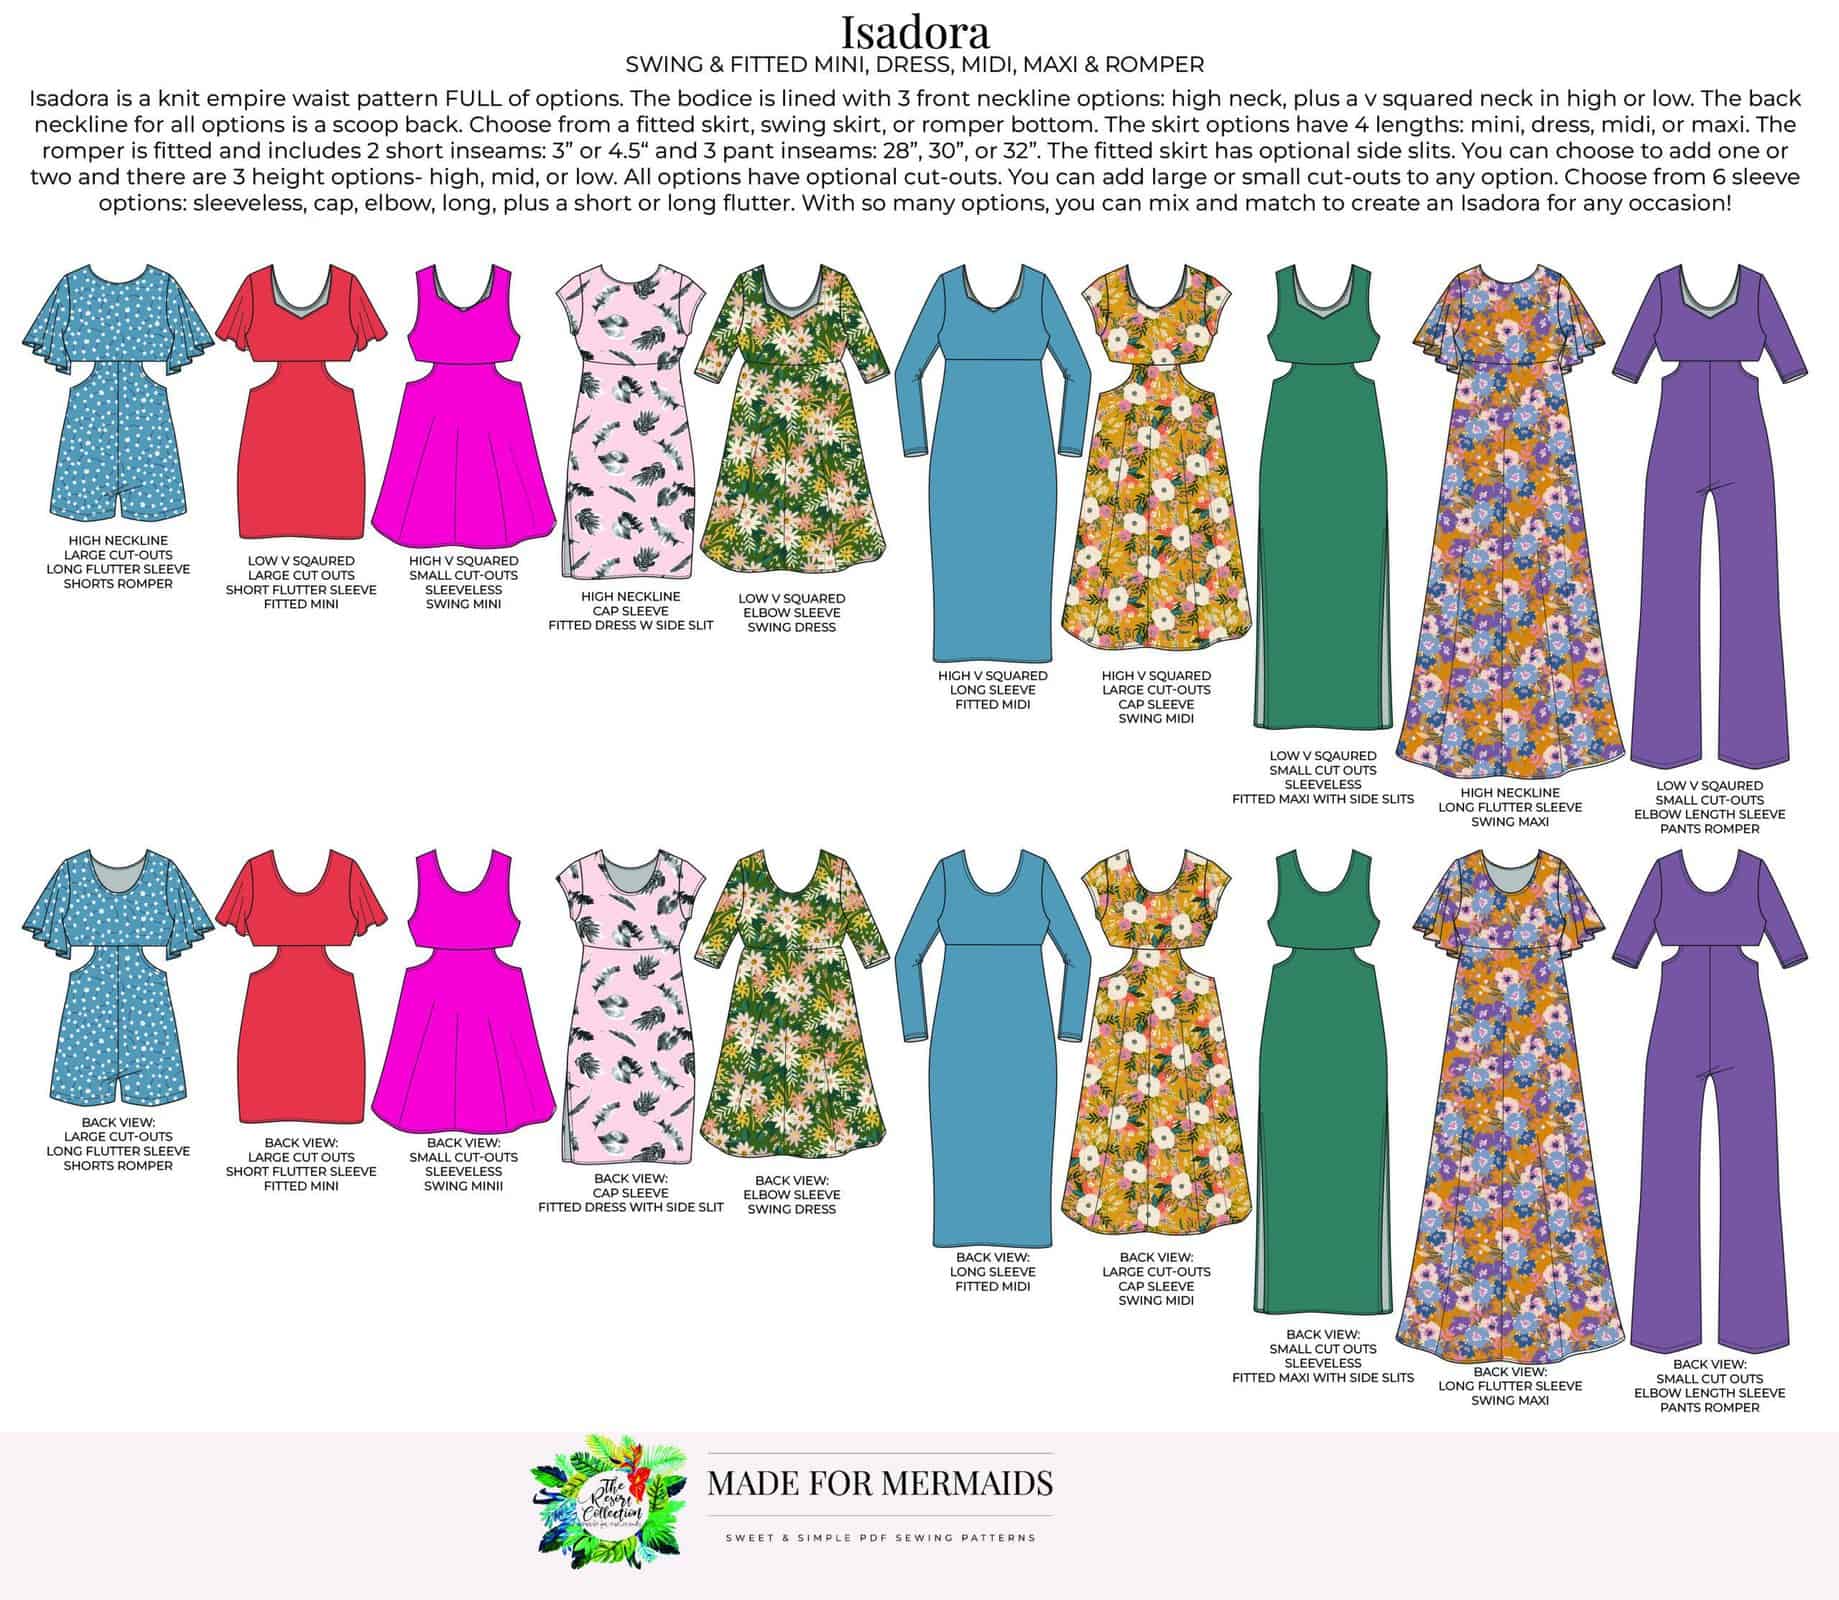
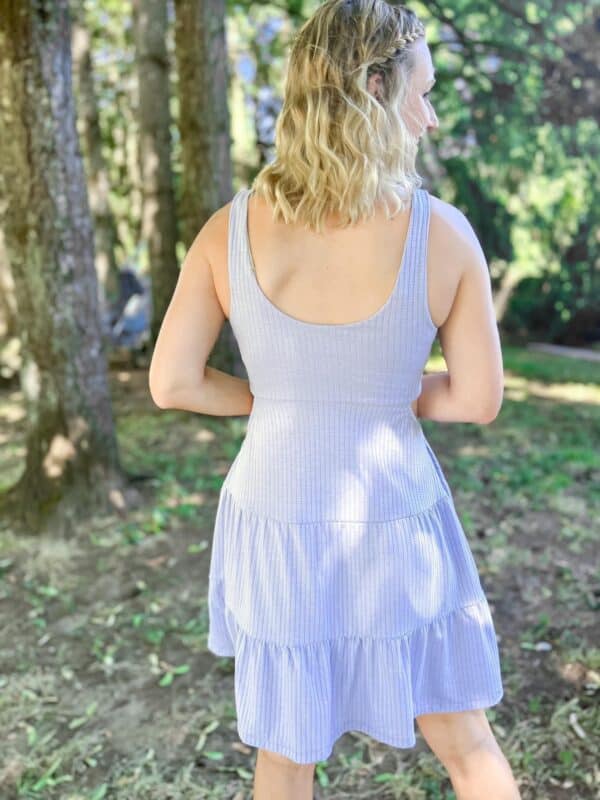
We are in our Isadora era at Made for Mermaids. Michelle’s newest knit empire waist pattern is FULL of options, and of course, we have a few hacks lined up for you too. The bodice is lined, with three front neckline options – high neck, plus a high or low v-squared neck. All options include a scoop neckline for the back. Choose from a fitted skirt, swing skirt, or romper bottom. The skirt options have 4 lengths: mini, dress, midi, or maxi. The romper is fitted and includes 2 short inseams (3” or 4.5”) and 3 pant inseams (28”, 30”, or 32”). The fitted skirt has optional side slits; you can add one or two slits, and there are 3 height options. No matter which version you decide to sew up, you can use the optional cut-outs as an added detail. There are both small and large cut-outs to choose from. Choose from 6 sleeve options: sleeveless, cap, elbow, long, plus a short or long flutter. With so many options, you can mix and match to create an Isadora for any occasion!

Getting Started
Before you purchase your patterns, there is a ton of helpful beginner information between the M4M and P4P blogs, in case you are new to knits, or new to PDF patterns in general:
- New to PDF patterns? Check out our helpful tips here
- New to sewing with knits? Brittany has some great info here
- Not quite sure how to measure yourself accurately? Don’t worry; check out the post here!
- Having issues printing? Most issues can be resolved by using our FAQs/troubleshooting tips
- Join our Facebook group here.
Choosing Your Options
We have lots of tester photos in our FB group and on the site if you want to see a variety of photos of each option before you decide! Here is a quick snapshot of the different options:
Fabric + Notions
Isadora is drafted for medium-weight knit fabric that has at least 50% stretch horizontally and vertically. Some great options are double brushed poly, ribbed knit with good recovery, cotton spandex, and high quality modal or bamboo lycra. Fabric with a softer drape and more vertical stretch, like rayon spandex, will “grow” with wear and feel looser and/or longer than the intended fit.
You may also need:
- Optional: 1/4″ clear elastic for added support
- Optional: 1/2″ interfacing or knit hem tape for hemming
Isadora Hacks
Our beautiful team had SO many fun ideas for their Isadora – we have a lace hack, a side slit hack, and more for you.
Lace Hack

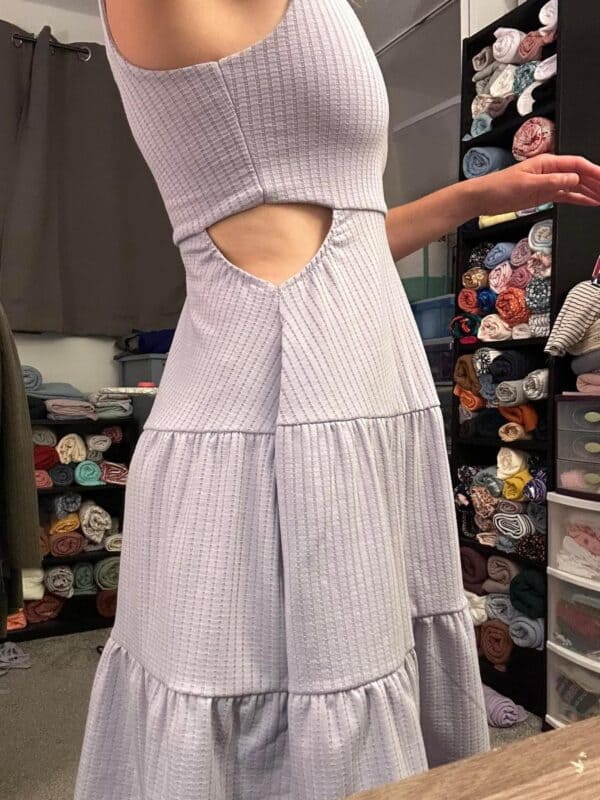
If you love the look of the cut out sides on the new Isadora dress but do not love having exposed skin, I have the hack for you! Adding coordinating lace to the cut outs gives you a nice little peek-a-boo. Or the pop of lace can add a bit of contrast to your dress. Either way, let me show you how to add the lace detail.


First, take your skirt pattern piece (fitted or swing) and pick if you want to make a large lace cut out or a small lace cut out. I chose the large cut out for this dress. The top and side of the cut out already have a seam allowance incorporated in the regular pattern piece, but you need to add a seam allowance to the curved portion in order to sew it to the skirt. Add a 1/2″ seam allowance to your pattern piece.


Next use this new pattern piece to cut out 4 pieces of lace (2 regular and 2 mirrored). Cut 2 skirt pieces on the fold using the regular pattern piece.

With right sides together, ease the lace curve to the curved portion of your skirt piece. You may need to use a lot of clips or pins to help ease the fabrics together! Also, most lace fabrics have a right and a wrong side so make sure you cut your pieces correctly.

Optional- baste the lace to the skirt piece. I recommend this as my lace wanted to slip against my skirt fabric.
Then, sew the lace to the skirt with a 1/2″ seam allowance using a stretch stitch or a serger. Finally, carefully press the seam allowance down towards the skirt. Finish with a long straight stitch to top stitch the seam allowance to the skirt in order to prevent your seam from flipping up and showing through your lace.

Now, treat the skirt as a non-cut out version and assemble the rest of the pattern according to the Isadora tutorial. I love the way this lace complimented my pink rib knit main fabric! –Stacey


Blythe Mash

To do this mash, you will need the Isadora bodice and top portion of the swing skirt, along with the tier pieces of the Blythe pattern. I wanted three tiers rather than the two tiers that the Bythe Dress is designed for, so I used the Blythe top/shirt tier length to get the desired look. There is some math involved to get the length for the skirt and width for gathering, I will explain that in later steps.
I constructed the bodice per the Isadora tutorial, making sure to adjust for side length if needed (armpit to waist).


For the three tiered skirt, I started with figuring out how long I wanted my skirt length to be. The Isadora swing skirt paper pattern piece length was 23”. I need my skirt length about 22”. So, I divided 22 by 3 (I wanted 3 tiers), which got me 7.33 for each tier length; I rounded up to 7.5” for each tier length for ease of measuring/cutting.
For reference, I make a size “Pink” and am 5’3″. Your specific measurements and dimensions will vary.
Tier 1:
Use Isadora skirt. Follow the tutorial for small cutouts, then measure and cut the skirt length at 7.5″. You do not need to adjust the width for this tier.
Tier 2:
Use Blythe’s “Double Tier Option – First Tier” pattern piece as a starting point. I added 6.5″ in width to the paper pattern piece to ensure I had enough width for full gathers. My full pattern piece was 18″ x 7.5″ (or 36″ x 7.5″ if not cutting on fold).
Tier 3:
Use Blythe’s “Double Tier Option – Second Tier” pattern piece as a starting point. Again, I added 6.5″ in width to the paper pattern piece to ensure I had enough width for full gathers. My full pattern piece was 24.5″ x 7.5″ (or 50″ x 7.5″ if not cutting on fold).
Once you have all of your skirt tiers cut out, follow the Blythe tutorial for gathering and skirt construction of front piece and back piece. I opted for a 1/4″ seam allowance.
Lastly, follow the Isadora tutorial for skirt attachment to bodice. I used ½” for skirt hem. That’s it – your Isadora + Blythe mash is ready! -Caity


Binding Hack

Hi everyone! Kelly here with a quick and easy binding hack for your cutouts on Isadora. Bindings can add stability to your garment and might just be easier than turning back your fabric and sewing depending on the fabric type that you’re using.


Let’s get started! First, sew up your bodice as per the tutorial. With your skirt or romper bottom pieces, choose the small or large cutout. Keep in mind that the pattern calls for the cutouts to be hemmed at either 1/4″ or 1/2″. Binding will not take that amount away from your cutouts, so trim that 1/4″ or 1/2″ back if you want the regular size cutouts. (I did not trim any back for my small cutouts.)


Take a flexible measuring tape and measure out the edge of your cutout. I measured 4” for the small Red size cutout. Each section will be bound separately, so you will need 4 pieces of binding. Cut your pieces at 1 1/2″ x (your measurement + 1″) The added inch is for ease of sewing – you will trim off any extra once it’s sewn into place. You can use your main fabric for this or if your main fabric is hard to work with, you can use scraps of a more stable knit.

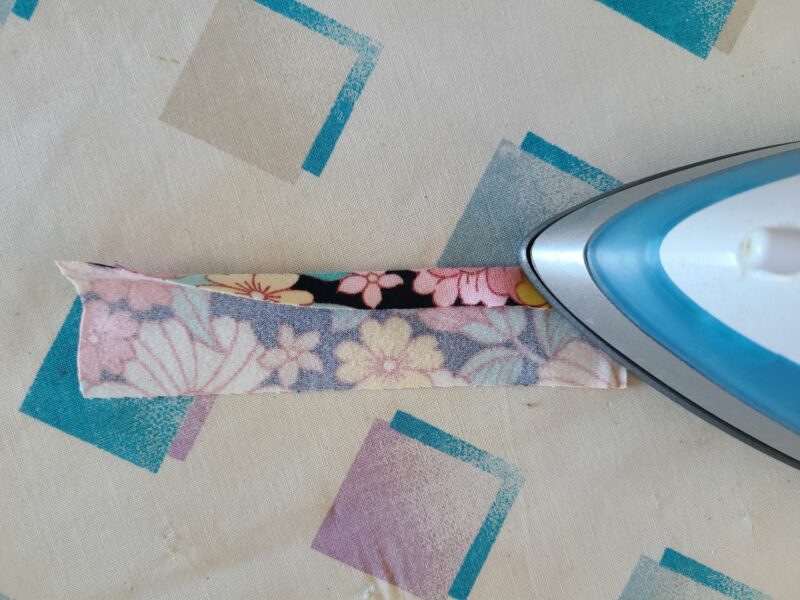

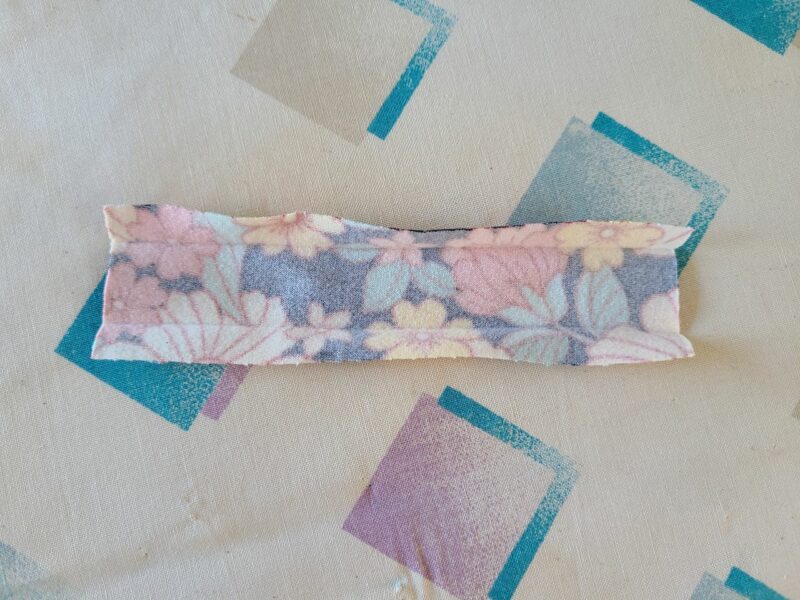
If your fabric will hold a crease, go ahead and iron each binding piece in half with long sides together. Next, fold each long edge in towards the middle crease and iron. This creates memory creases in your binding which are helpful when sewing the binding into place. (For more help with binding, see knit binding 101)


Mark the middle of your binding pieces and the middle of the cutout edges. Place one binding piece right side to the wrong side of a cutout and match middles. Continue to pin around the edge, stretching the binding only (do not stretch your skirt/romper piece) a little around the curves to keep the edges matched up. Sew into place with a long straight stitch using a 3/8″ seam allowance – you will see this matches the first crease in your binding piece. Repeat for all cutout sections.


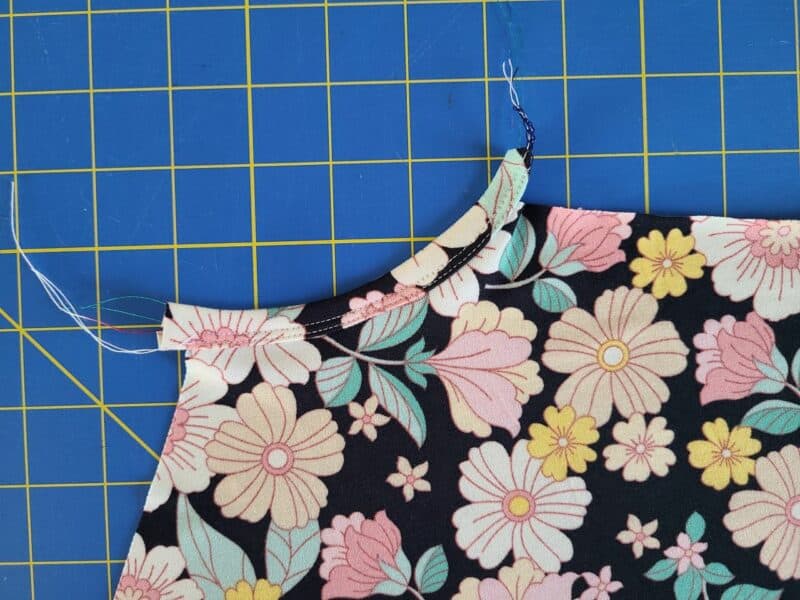
Fold your binding up and then fold the long edge down towards the middle crease/top of cutout. Fold again to the right side to enclose the edge. Now you will sew into place using a stretch stitch, zig zag, or your coverstitch.
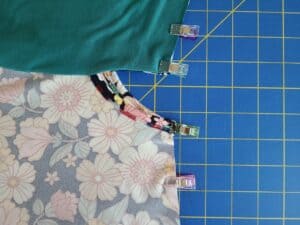


The next step is to attach the skirt/romper bottom as per the tutorial. When you match up the side seams, keep in mind that the binding may be thick and you will want to use a sewing machine to start the edge so it lines up nicely. If you’re stubborn like me and you want to strictly use your serger, you can cut a ¼” snip into the top edge of the seam to feed it into your serger and help it stay lined up well.


If you do use your serger for this seam, be sure to pull your serger tail through the stitching for a cleaner finish.


That’s all there is to it. Enjoy your beautiful new Isadora – you look fabulous! – Kelly
Romper Side Slit Hack

This is a super quick and easy hack! Use the high slit from the Isadora skirt on the pants romper option, and that’s all there is to it! I love the drama of the slit with the comfort of the pants. Michelle also used Stacey’s lace cut-out hack for this look. Basic black is anything but basic when it comes to Isadora!
Which version will you sew up first? We can’t wait to see!
Leave a Reply