FULL BUST ADJUSTMENT ON THE PENELOPE PRINCESS SEAM DRESS
Hi, I’m Dana Cole, Chief Chicken at The Slippy Chicken Company, and I was asked by Megan to do a little blog post covering how to do a Full Bust Adjustment on the Penelope princess seam dress, which has just been released by Made for Mermaids. I have to say that I didn’t need to do an FBA on this myself, though I often do with so many other designers. M4M drafts for a much more generous bust, and so my ample 51” bust fit within my usual size red perfectly. However, if you find your full bust measurement falls in a size above your over bust measurement, you will want to do an FBA…and here’s how!
First of all, there are two ways of doing this. The first can be used if you only need to make a small adjustment; for example, say your full bust is only 1” bigger than the pattern is drafted for. It’s quick and easy and only takes a sec, but gets you just that little bit more room for the perfect, handmade fit.
FOR BOTH ADJUSTMENTS – START HERE
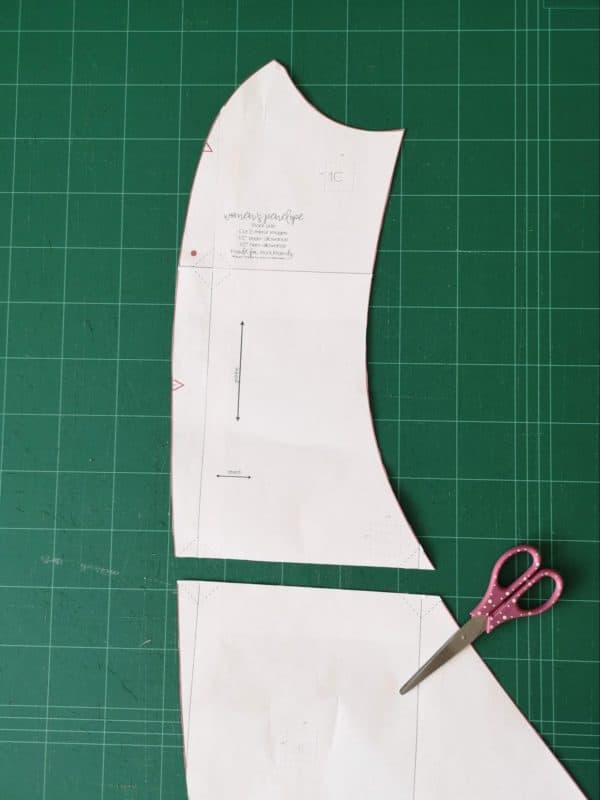
First, we need to remove the skirt section from the bodice section. I held the pattern pieces up against me and used that as a guide, cutting them off where they fell at my waist. Here is the side front to show you. These just get taped back on at the end, so you might want to write which is for the side front and which is for the centre front onto the skirt pieces themselves so you don’t lose track.
SMALL ADJUSTMENTS ONLY (1” OR LESS)
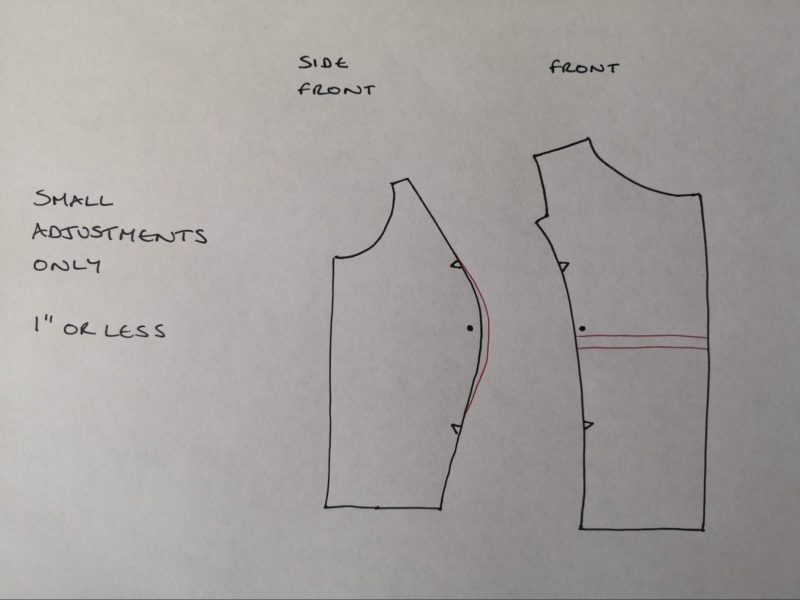
The princess seams on the Penelope fall slightly towards the side seams, so we are able to add this small adjustment onto the side front piece only. The Bust Point is marked on the pattern with a red dot. Using this as your guide, you can add half of the total amount of extra bust space needed in a gentle curve to the side front piece, then add length on the front piece to match.
For example, if your full bust is 1” bigger than drafted for, you will need to add ½” to the side front piece (which will then be doubled, as you will repeat it for both the left and right side of your body, giving you the full 1” increase). You may find a French Curve helps you draft this cleanly, but you basically just need to measure out ½” from the bust apex, then draw a nice gradual curve back in again. As I said, this is a pretty quick and dirty way of doing the adjustment, so you are really just guesstimating here.
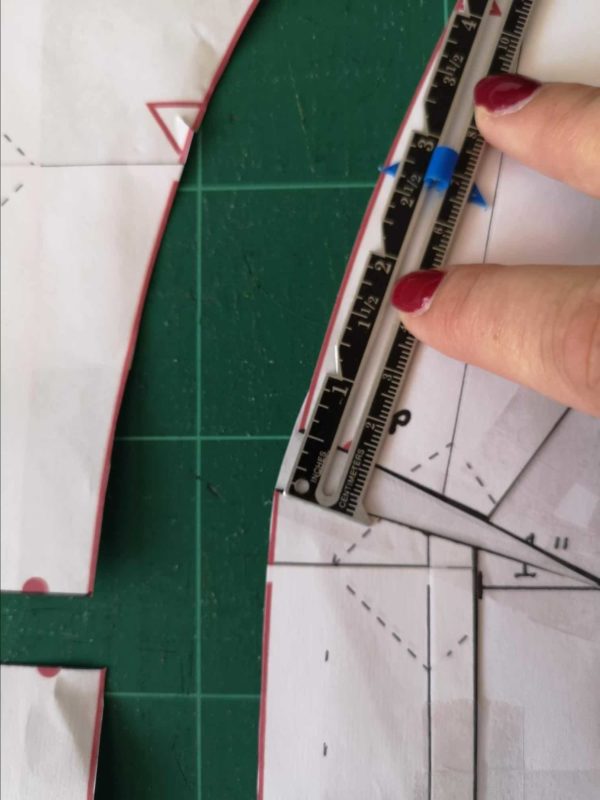
Then, you will need to add some extra length to your front piece to match the adjustment you just made. Use a flexible tape measure to measure along the curved seam of the side front piece, measuring both the original, and the new curve. Whatever the difference is will also need to be added to the front piece, as per the illustration above. So if your curve now measures ⅜” longer, cut the front piece and add ⅜” to the total length. Done!
FULL BUST ADJUSTMENT (FOR 1” OR GREATER)
Ok, if your full bust measures more than 1” fuller than the pattern was drafted for, you will need to do a proper full bust adjustment. This is going to take a little extra time to do, but you’ll be glad you did it when you get a much better fit!
Due to the way the Penelope is drafted, we are going to be adding all our extra fullness to the side front piece. This is an easier bust adjustment than having to add to both the front and side front pieces.
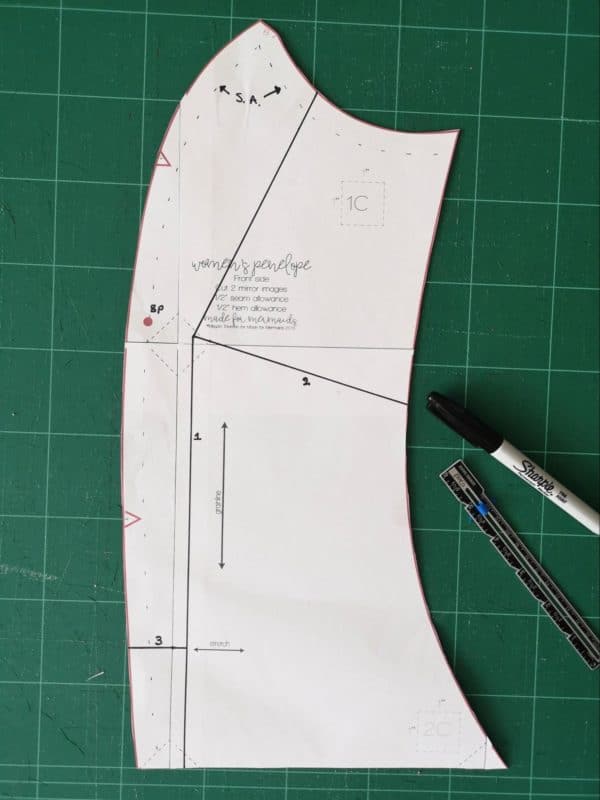
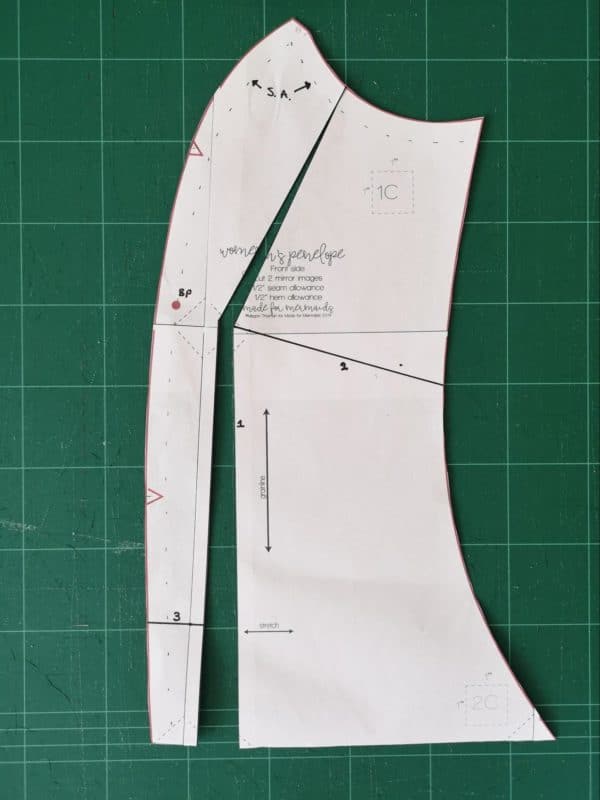
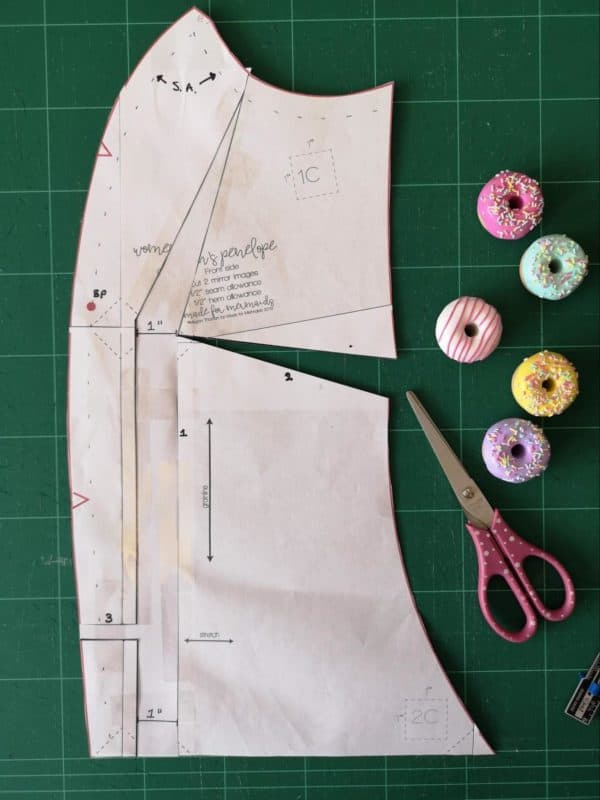
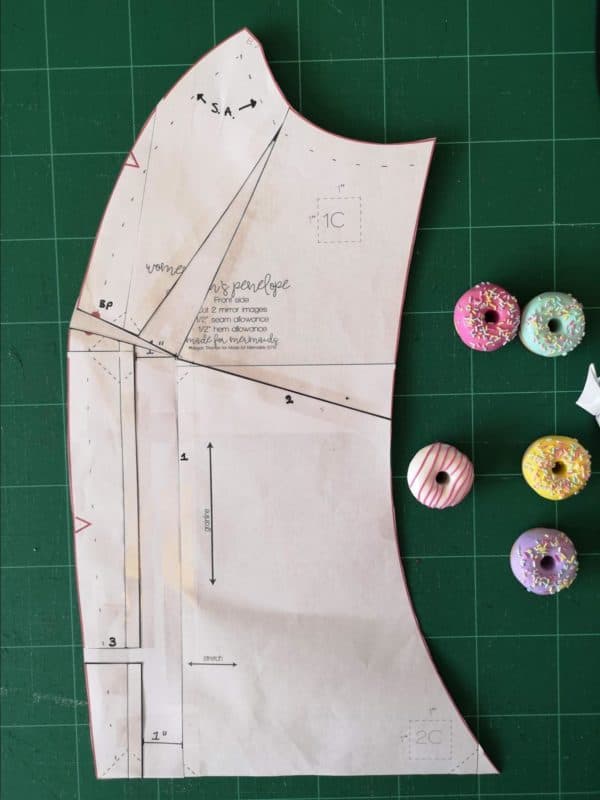
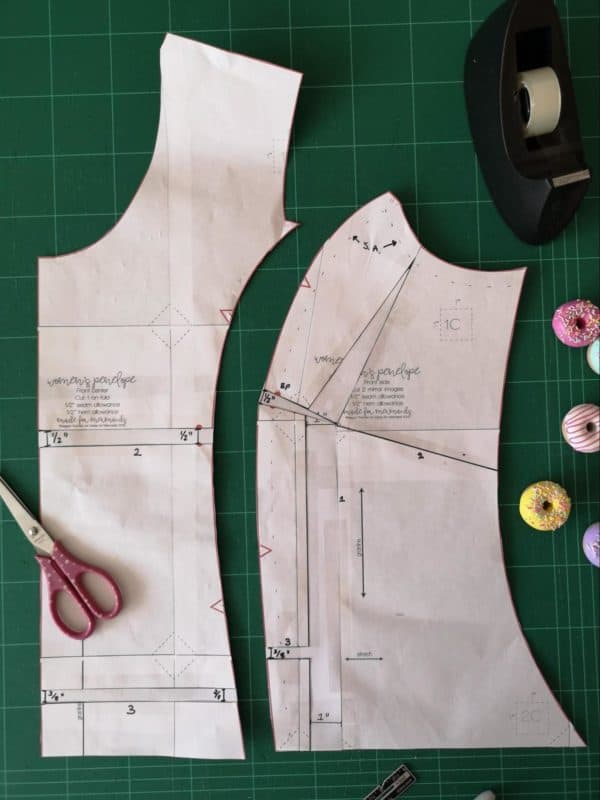
First of all, we need to draw some guidelines on our side front pattern piece. I am using a size Red here in this example. Draw in your ½” seam allowance lines along the armscye, and down the front curve (dashed lines in my picture, marked S.A. at the top). Your Bust Point is marked by a red dot on your front curve seam, I have also marked it “BP” to make it easier to see. Draw a point, 1” away from the bust point, towards the side seam and a little lower than the BP. Your lines will radiate from this marked point.
- Front Side Pattern Piece
Draw line 1, parallel to the grainline, from this marked point down to the bottom of the pattern piece. Then extend this line 1 from the marked point up into the armscye at a point approximately ⅓ along the whole armscye length (you will need to place both centre front and side front pieces together to get the whole length of the armscye, and therefore make an approximation of this ⅓ distance).
Line 2 extends from the marked point out and down towards the side seam, approximately where a dart would go, pointing up towards where the Bust Point is marked by the dot.
Line 3 is drawn further down the pattern piece, below the bust notches.
- Front Center Pattern Piece
On the front center pattern piece, draw lines as shown above. Line 2 is across from the bust point, horizontally across the pattern piece.
Line 3 is opposite line 3 that you’ve just drawn on the side front piece.
Note: Line 1 is only marked if adding width to the side front and the front piece; if you remember at the beginning I said we were only adding to the side front piece, so we can ignore what would have been line 1.
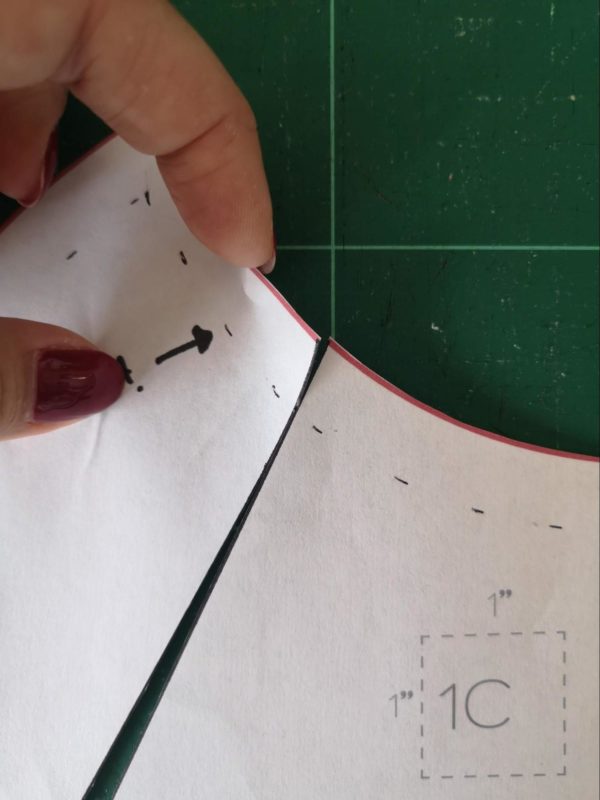
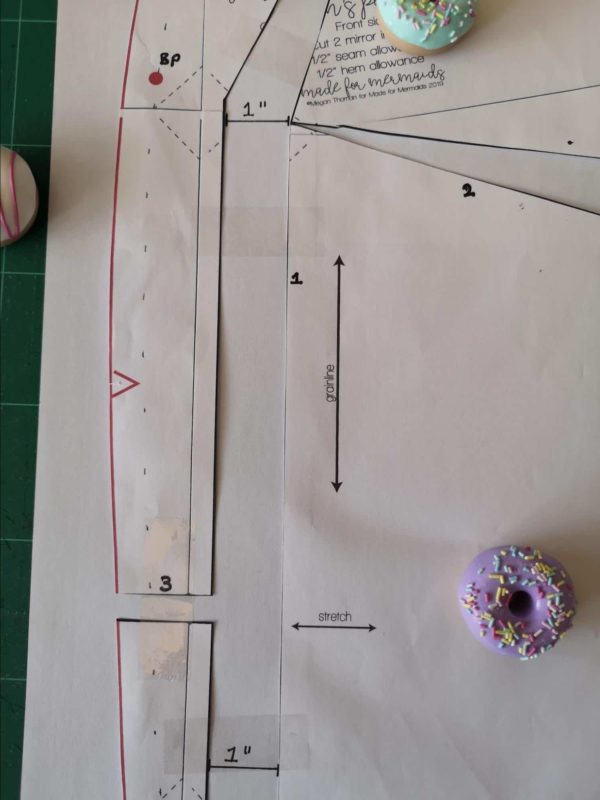
Next we cut along line 1 on the front side piece, from the bottom, up to the marked point and then along to the seamline. DO NOT CUT THROUGH THE SEAM LINE. Instead you then make another small cut, from the outside edge of the armscye, down to the seamline, making a small hinge. See the pictures above. NOTE: If you cut through the seam line, when we make the adjustment later, we will end up by making the seam line itself longer, which we don’t want to do.
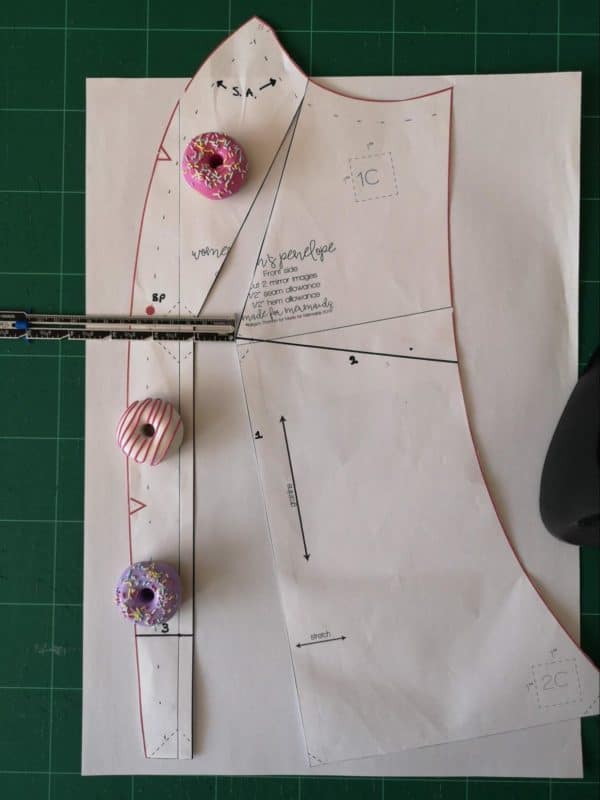
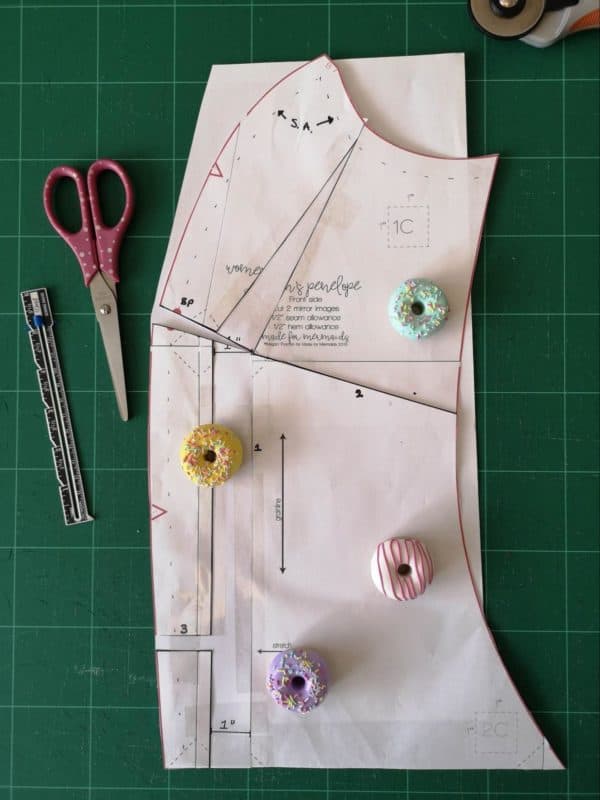
Place a piece of paper behind the pattern piece and then either pin the pattern piece in place or put weights on it where I have in the picture, to stop it shifting about.
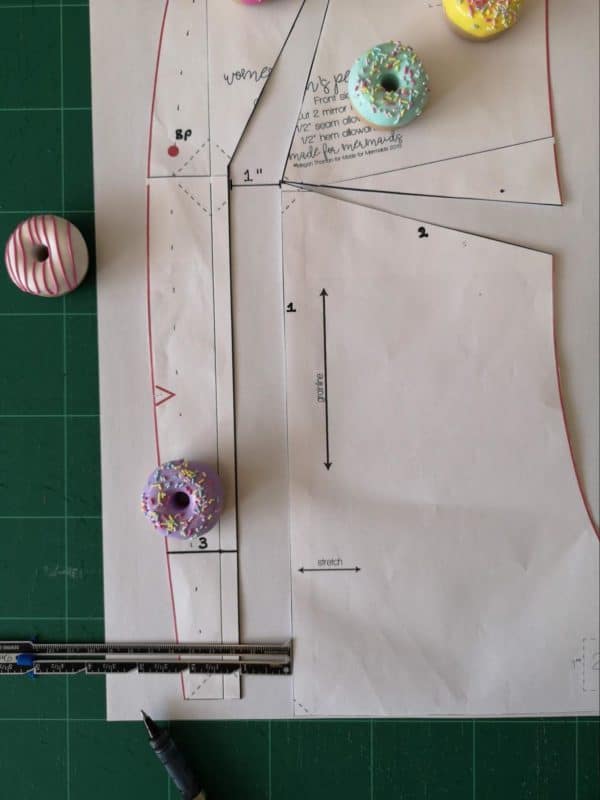
Pull the pieces apart long line 1, measuring the space between the separated line 1. This measurement should be half the total amount of extra bust space required. I.e. if your full bust is 2” bigger than the pattern is drafted for, then the space between line 1 should be 1”.
This measurement effectively gets doubled as you will use it for the pattern pieces on both the left and right side of your body, hence why it is halved here.
Then, after anchoring the top of the pattern piece with more weights, bring the main body of the pattern piece down and again measure between line 1 at the bottom of the pattern piece. Anchor the main body as well.
Cut along line 3, and bring the small piece you have just cut off down to meet the main body of the pattern piece.
Tape line 1 and line 3 in place. DO NOT TAPE LINE 2.
Trim the paper away from the curves and the back of the pattern piece.
You’re doing really well, we’re nearly there now. Think how great your dress is going to look when it’s all done!
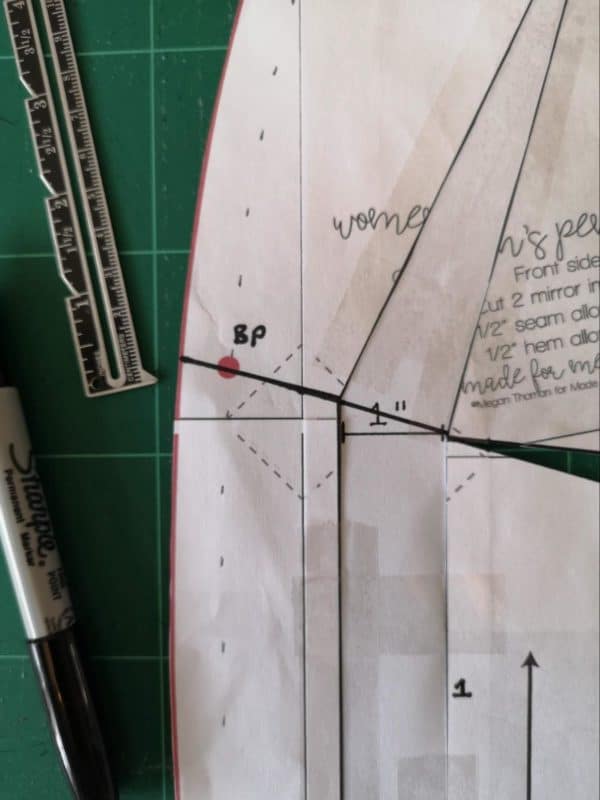
Then draw a line from the outside curve, through the bust point and down, ALMOST TO THE TOP OF LINE 2. DO NOT CUT THROUGH HERE; WE ARE MAKING ANOTHER HINGE.
Place some paper behind the pattern piece and weigh the bottom down with some weights, or pin in place. Then close the line 2 dart; this will hinge at the top of line 2 (where we just created a hinge) and open up the curved princess seam. Tape line 2 closed, and tape over the new cut line we have just opened (see right hand picture, above). Cut away the paper excess from the back and you will need to slightly re-draw the curve over the bust apex, now we have extended it.
This is your newly finished, side front pattern piece. Not as difficult as you thought? Good!
Now we just have to extend some length on the front piece to match.
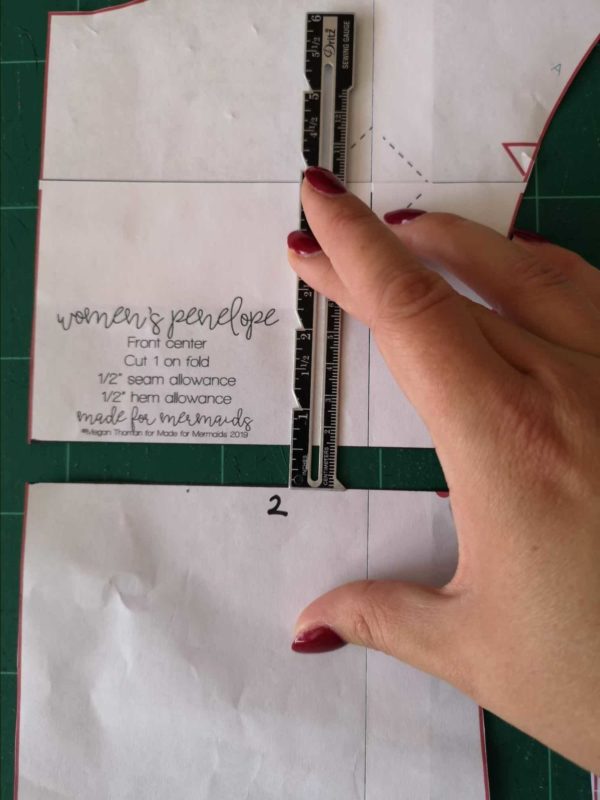
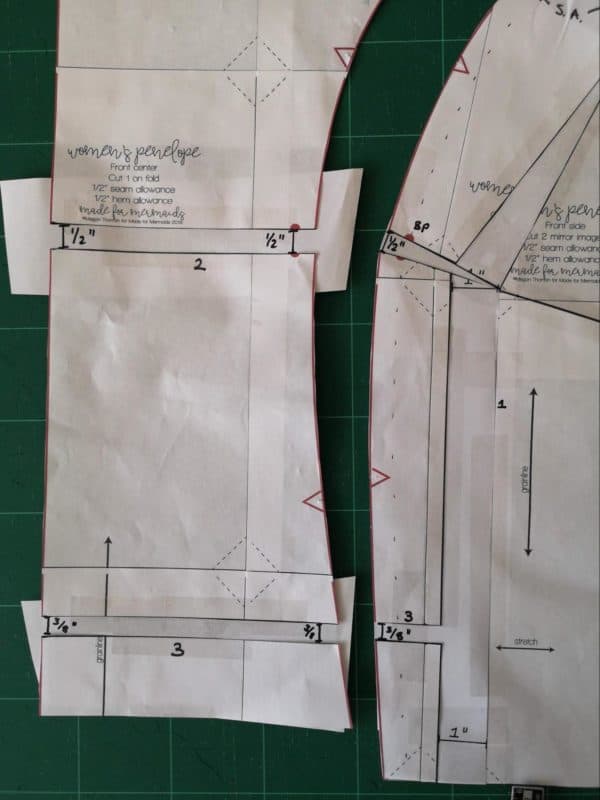
Take your side front pattern piece and measure the opening we have just made at the bust apex. In this example it is ½”. Then take your front centre pattern piece and cut along the line 2 line, dropping the bottom of the pattern piece down by the same measurement (½” in this example).
Then measure the distance you opened line 3 on the side front piece, and open line 3 on the front centre piece to match (in this example ⅜”).
Place paper behind these new cut lines and tape down. Trim the excess paper away from the pattern piece and you’re done.
Here are your two new complete pattern pieces.
You have added extra space to help accommodate your bust comfortably.
You can also see that we have added width to the pattern piece along its length and down to the join with the skirt piece we originally cut off. Personal preference and your measurements come into play now. If you prefer to keep the added width you can take the skirt piece, slice it vertically in line with line 1 and add the same extra space into it to match the bodice piece. Then tape them back together and proceed, following the pattern tutorial instructions.
If, however, you have a narrow hip or prefer to remove the excess width at the waist you will need to tape the front side bodice piece and front side skirt piece back together, matching them up along the side seam (not the curved seam we have been altering). Then you will need to ‘true’ the curved princess seam back to match. Starting underneath the bottom bust dart on the curved princess seam (point 1) and ending midway down the skirt piece on the curved princess seam (point 2), draw a gradual line connecting the two spots. This removes the excess waist and hip width gradually. However, the extra width at the waist is part of the bust adjustment and helps the garment to fit better over the bust, so it is more likely that you would want to keep it. Try the garment on inside out before topstitching and you can pin out any excess fabric you may not want over the waist and hips.
No adjustment needs to be made to the front centre pattern piece as only length was added, just tape it back on.
Hopefully this has helped you understand how to adjust the Penelope dress to get the best fit over your bust. If you need any other help you can ask in the Made For Mermaids Facebook page or see if you can get some of the great fitting reference books that are available for the home sewist either from the library or your local book shop.
Thanks! – Dana


Leave a Reply