Hi everyone,
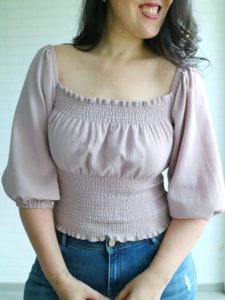
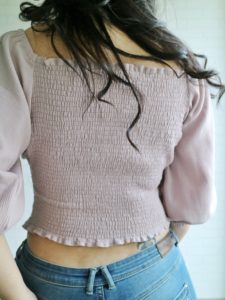
I’m back with another fun hack, a shirred Eloise top.

When I was sewing my Siena maxi I knew that Eloise was the perfect top for it. The only problem was that Eloise is drafted for knits and Siena for wovens and I wanted it to be a matching set.
Shirring to the rescue!
I know the idea of this technique can be a bit daunting, but this was only my second time doing it and if I can do it, you can too! 😉 It’s a lot easier than it sounds, I promise.
Shirring
“Shirring is a sewing technique that uses multiple rows of stitches with elastic thread to create rows of gathers.”
It adds elasticity and structure to the fabric and it’s best done using a lightweight fabric. If the fabric is too heavy, the elastic thread won’t be strong enough to achieve the full effect.
Some basic points:
- Shirring elastic on the bobbin, regular thread in the needle
You need the wind the elastic thread on the bobbin by hand being careful to not stretch it. - Sew with a straight stitch – longer stitches will gather more than shorter ones
I used the longest stitch on my machine, which is a 5. - You may need to adjust the tension settings on your machine
This really depends on your machine, so try it with your regular settings first. I was lucky and didn’t need to change anything, but every machine is different. - How many rows and how far apart they are is up to you
The more rows and the closer together they are, the tighter/stronger your end result will be. I made mine 3/8″ apart.
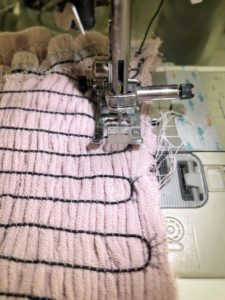
Once you have the elastic thread on the bobbin and your machine set, all you need to do is sew rows of straight stitching. Yes, simple as that!
Here are some tips and tricks I found useful:
- Wind multiple bobbins in one go
Winding by hand is by far the most tedious part of this process and because the elastic is a lot thicker than regular thread, it runs out very fast. It’s best to have a few at hand so you don’t have to spoil your sewing fun. - Hem top and bottom edges of pattern piece beforehand
Once the piece is shirred the edges will be gathered and it will be a lot harder to hem. - Make one continuous row by pivoting the needle, instead of starting and stopping each row individually
This makes the whole process a bit faster and uses less elastic. Both excellent reasons in my book! 😉
Let me show what I mean by a continuous row:
At the end of each row keep the needle down, lift the presser foot and pivot your fabric 90 degrees. Lift the needle and bring the fabric down to where the next row will be, lower the needle and pivot your fabric back to the right position. Keep doing this at the end of each row. Important: the seam allowance will not be shirred, so you’ll need to stop and pivot the fabric right at the start of the SA.
-
- You may choose to mark the rows on the right side of your fabric with some chalk of washable marker as guidelines
Or you can just eyeball it using your presser foot and markings on your machine as guides as I did.
ELOISE TIME
To make this top you’ll need:
- Eloise pattern;
- light/medium weight woven fabric;
- elastic thread;
- other basic sewing notions (sewing machine, thread, scissors, etc.)
step 1
Multiply your bust measurement by 1.5 and determine how long you’d like your bodice to be.
These numbers will determine the size of your front and back pieces. Don’t forget to account for seam allowances.
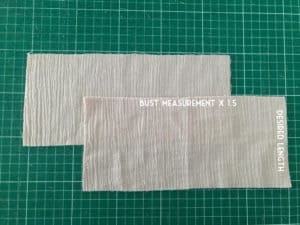
For reference, my crop top bodice is 12″ in length and the longer one is 16″.

step 2
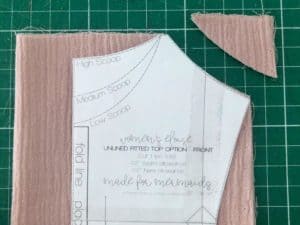
With your front and back panels folded widthwise, place your Eloise pattern pieces on top of it aligning the armscye to the open edge. make sure to keep the “on the fold” edge of the pattern parallel with the fold of the fabric. You’ll cut the armscye only, the rest will remain a rectangle.
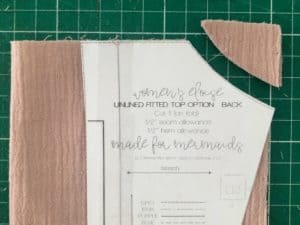
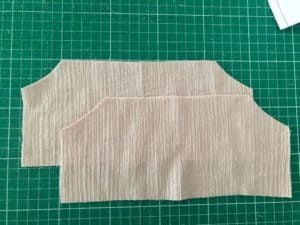
step 3
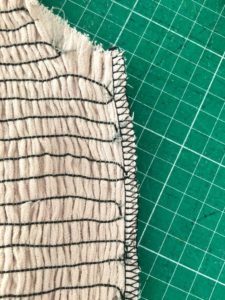
Hem the top and bottom edges of your pieces.
I forgot to photograph this step, but just use your preferred method and use the seam allowance you allotted for when cutting the piece. I personally prefer a single fold with this one to reduce the bulk when it’s gathered.
step 4
Time to shirr!
Here it comes to personal taste and the sky is the limit. 😉
As I mentioned before, the amount of rows is up to you. Just keep in mind that the more rows you have, the more stability you’ll have.
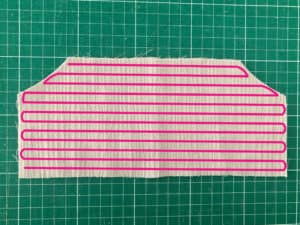
Mine are 3/8 apart and I used the presser foot as a guide
If you’d like the front bodice to look like mine, the length of the piece left unshirred will be determined by your bust size. Just measure it on your body to determine how much space you need. I’m a B cup and left 7 inches free of elastic.
The top shirred edge is about 2 inches in length.
I started from the top edge, shirred 2 inches down, and stopped. Then I marked the space I was leaving shirr-less (is that even a word? lol) and restarted from the bottom edge up to that mark.
This is what it will look like when done.
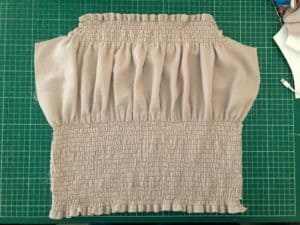
Repeat the process for the back bodice, but this time leaving no space. Just shirr it from top to bottom.
step 5
Sew front and back bodices together.
For this step, I prefer to sew the side seams using the sewing machine and then use the serger without the knife to finish the edges. That way I don’t risk cutting the elastic.
Yes… I used black thread because I was too lazy to rethread my serger… please don’t judge me. 😛 And as I only had black elastic thread at hand, they match and we’ll call it a style preference, deal? lol
step 6
Choose what fabulous sleeve option you want, sew and attach it to the bodice as per pattern.
-

- short sleeve

-
- 3/4 sleeve

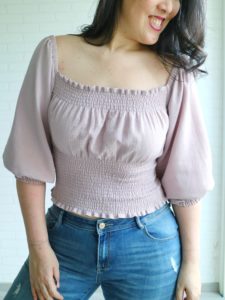
You’re done!
Put your top on and go strut your stuff in all your shirred gloriousness <3


If you have any questions, feel free to give me a shout.
You’ll find me at:
www.liviality.com
Instagram: @livia.jy
Facebook: Liviality
xxx
Livia
Leave a Reply