Oh hey, Mermaid Friends! Jody here for my first contribution to the M4M Blog! I’m bringing you a couple of Romper Hacks you can do with the the new Sommer Pattern. We knew the adorable bubble romper option of the Baby Sommer pattern was going to be a big hit with so many of you, so we decided to have a hack ready for you to do something similar with the girl’s Sommer pattern as well! I’ve made my daughter two rompers by mashing the Sommer bodice with the bodices of two other patterns. I used both Lea and Lillian patterns to show you two completely different looks you can get! My Sommer/Lea version is all knit, and my Sommer/Lillian version has cotton woven shorts with elastic casings at the legs. This is a very simple hack that just requires modifying the bodice pieces, and the rest of the garment is constructed per the pattern!
The steps will be the same for both versions, but I’ll show you specifically how I modified the pieces for each.

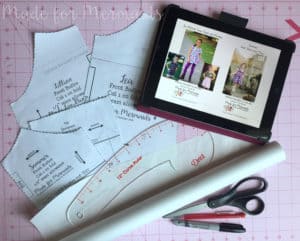
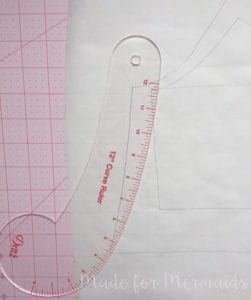
First up is your supplies. To create your new bodice pattern piece you will need the original bodice pattern pieces from either Lillian or Lea as well as the bodice pieces from Sommer. You’ll want some sort of tracing paper to make the new pattern piece. I use freezer paper because its durable, you can still see through it to trace, and its cheap and readily available at the grocery store! You will also need a writing utensil and your full pattern instructions for both Sommer and either Lea or Lillian depending on which you choose. I also find a curved ruler helpful here to draw the new side seam curve, but its definitely optional!
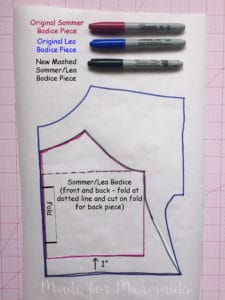
Below is how I mashed the Lea and Sommer bodice pattern pieces. Since the Lea bodice pretty much sits at the natural waist, I figured I could use the length of the natural waist Sommer bodice piece, and just make sure I add on 1″ for the casing allowance. I first traced the Lea pattern on my tracing paper as a starting point (shown in Blue). Then I set my Sommer Bodice piece on top of that, aligning them at the “fold” edge, and moved it up one inch from the bottom of the Lea bodice. After I traced the Sommer Bodice onto the Lea bodice (Sommer shown in Pink), I used my handy curved ruler to create a gentle side seam curve from the chest of Sommer, down to the bottom corner of Lea. I didn’t want to start the curve straight from the armsyce point of Sommer, because I wanted it to have the same tight fit through the chest as the original Sommer pattern has, so I started my curve about 1.5″ down on my size 4 bodice, FYI. I then layered my back bodice piece and traced its top line onto this as well so that I could use just one pattern piece for the front and back bodice by simply folding down the front bodice top points at the dashed line. This saves me from not only wasting time and paper, but also not having to try to recreate the same side seam curve!

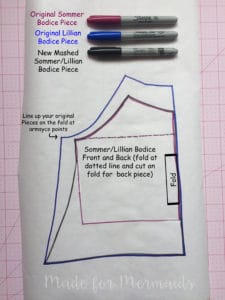
Next up is how I mashed the Lillian and Sommer pieces. I followed essentially the same process as described above, starting with tracing the Lillian bodice piece onto my paper (shown in Blue), then layering the Sommer Bodice piece on top to trace (shown in Pink). This time though, there was a clear armsyce point to line them up at, so I did that and also aligned them on the “fold” edges. I then used my curved ruler again, and did my side seam curve out to the bottom point of the Lillian bodice. Again, I left the very top part of the bodice straight down for about 1.5″ before curving to keep it tight through the top part of the chest. I also did the same deal with the back bodice, using one piece for both and using the dashed line as a guide for where to fold down to create the back bodice piece.

Once you have traced your new Bodice pattern piece (the black outlines in the above pictures!), you can cut that baby out and get started with the fun part! You will create the bodice portion of your romper per the Sommer pattern; simply substitute the newly created bodice pattern piece with the more flared bottom piece you just made. Other than using your new bodice pattern piece, the cutting and construction will be per the pattern. Remember you can also choose your strap options from the pattern (I just opted for the single straps as I assumed that would be easiest for my 3.5 year old to manage if she had to use the bathroom on her own while wearing this!) Once you have created your bodice per the Sommer Pattern, you will pick up and proceed with the Bottom of your romper by following the steps for creating the shorts and attaching to the bodice in either the Lea or Lillian pattern! I told you it was a simple and straightforward hack!


Also a quick note for further hacks you can do with these patterns. You could also use the skirts from either Lea or Lillian and that newly created bodice piece. This would be a great hack if you want to add pockets to your dress as Sommer doesn’t include those. I have to say, these patterns are each great on their own, but being able to put them together in various ways opens up even more awesome possibilities! I hope you’ll give this one a shot. Be sure to share it in the Made for Mermaids facebook group if you do!
Jody is a wife and mom of 2 rambunctious pre-schoolers. She loves: (in no particular order) her children, her husband, her Peloton bike, designing jewelry, good wine and bourbon, sewing (duh), fabric hoarding, pattern testing, running, sleeping and coffee!
Leave a Reply