At the beginning of the year, we asked in our Facebook Group what you guys would like to see on the blog this year. Over and over again we heard, “grading!” We do include diagrams on one of the first few pages of each of our tutorials that provide grading instructions that are specific to that pattern. But we understand you might like to see a little more information! Hopefully this comprehensive post clears up any questions you have.
The first and most important thing to do is be sure you are measuring in the correct place! Waist designates the natural waist and hips designates the fullest part of the booty, not the hip bones! Megan’s sister Judy has a thorough blog post with photos showing where to take these measurements here.
It’s also important to read the sizing information within your pattern. It will tell you whether or not you need to grade for waist and/or hips. Some patterns may have enough ease that it’s not necessary to grade, or others may tell you to choose your size based on hips instead of upper bust, such as Paige. This information is located in the paragraph just above the size chart in your tutorial.
Finally, this is a lot of information to digest all at once. I suggest only reading the information that pertains to you so as not to overwhelm yourself! And remember, the more you do it, the more this will become second nature.
Grading for a Larger Waist
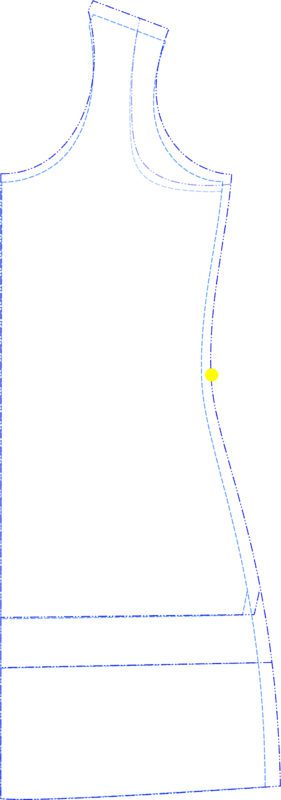
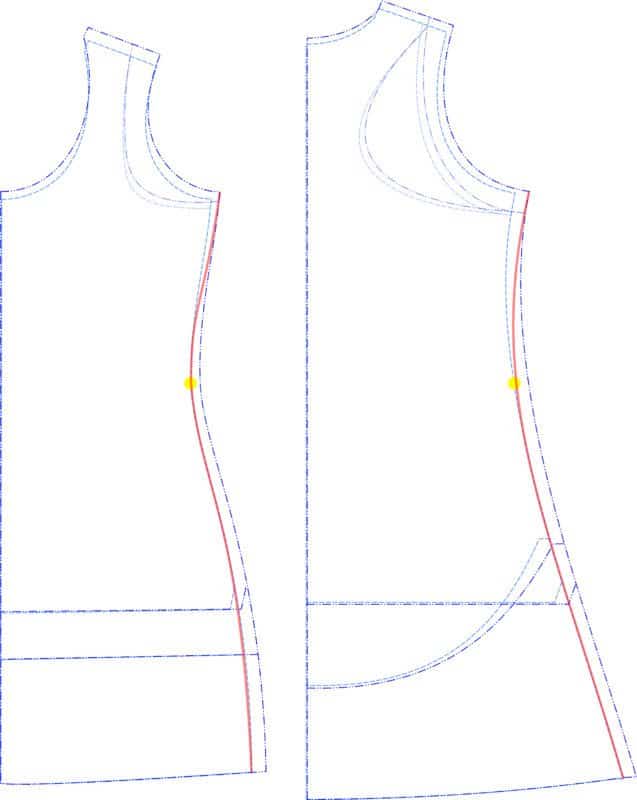
When grading out for a larger waist, you want to make the curve as gradual and true to the curves of the pattern as possible without widening the pattern at the bust too much. Start by marking the waist of the larger size (if you’re unsure of where the waist is, all of our patterns are drafted for an 8″ side waist – make sure you remember there is 1/2″ seam allowance there as well!) – shown as yellow dot below.
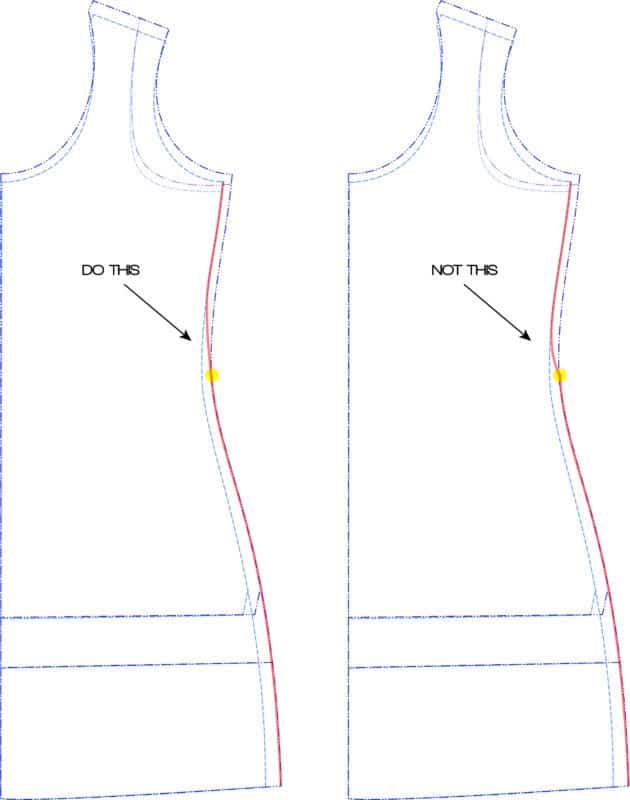
Next, trace along the side seam of the pattern piece of the smaller size. As you get closer to the waist, gradually start to curve out to the larger size. You want to be careful not to make your grade too sharp by grading out too late, or grade out too early and make the bust larger than your measured size. On the left below I show an example of a smooth grade out to the waist. On the right below, you’ll see an incorrect grade – notice how the grade is very sharp and makes a “point” on the side seam. A simple way to check your grade is to look only at your new side seam. Does it have any sharp points or unnatural curves? Then you need to smooth it out a little more.
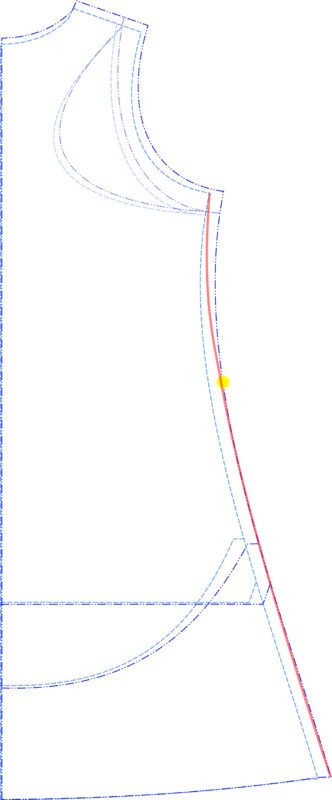
Remember that I mentioned it’s important to maintain the same shape of the side seam? Sometimes that means you start grading out earlier. See the grading below – it starts grading out at the bust much sooner than the example above, in order to maintain the original shape of the side seam:
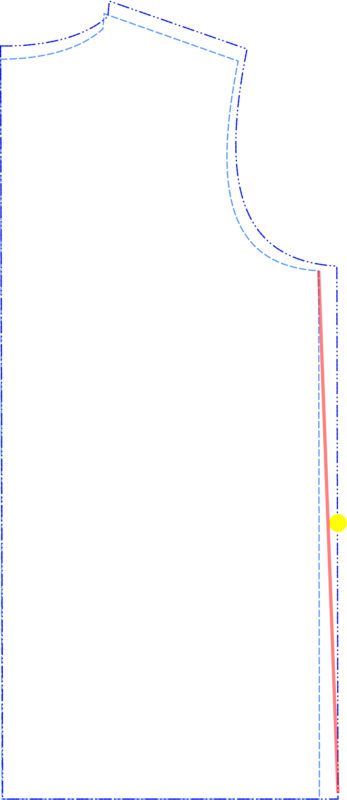
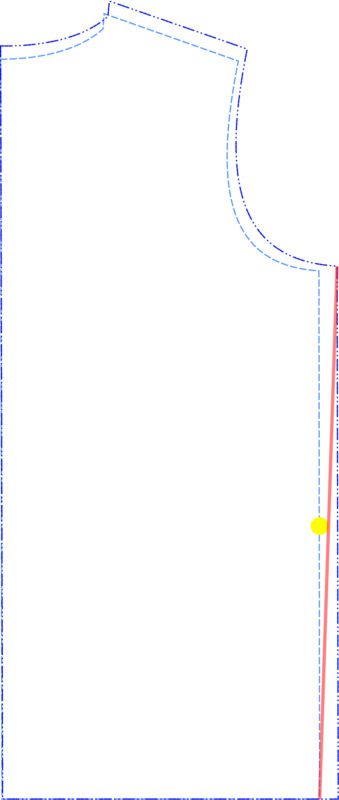
To grade for the waist on a pattern with a straight side seam, simply draw a diagonal line from the top of the side seam to the hem. While you won’t quite reach the larger waist size with this method, it makes for the most natural-looking side seam.
Let’s talk grading out more than one size. Since our patterns are drafted to a curvy standard, those who are more of a rectangle shape may find it necessary to grade out more at the waist. In order to keep a smooth curve, you will need to start grading out from the bust even sooner.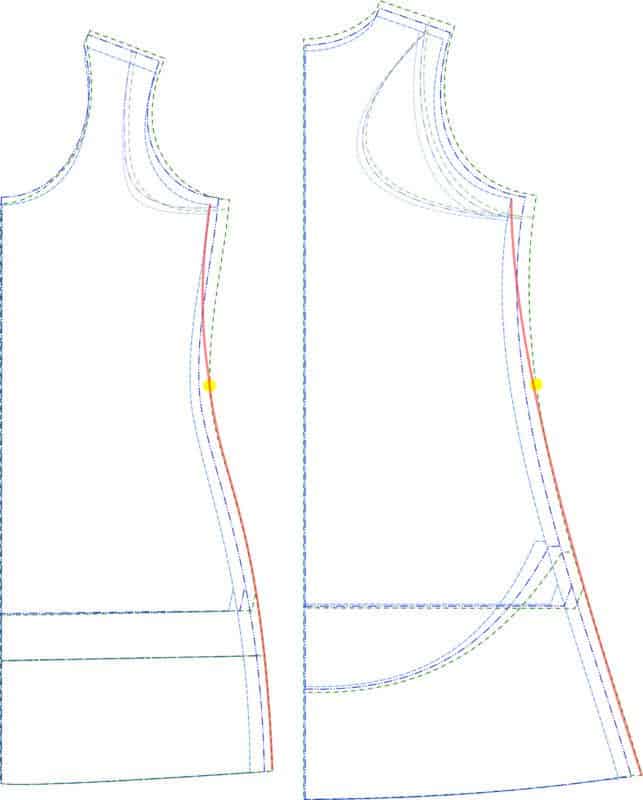
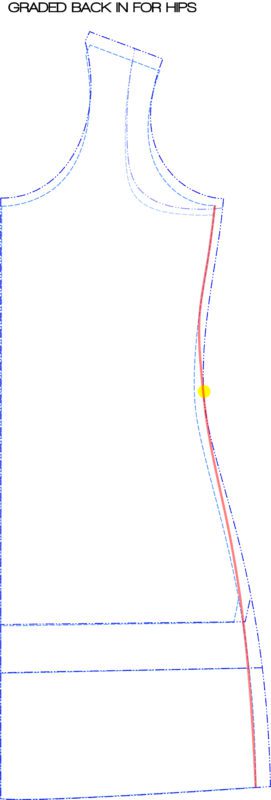
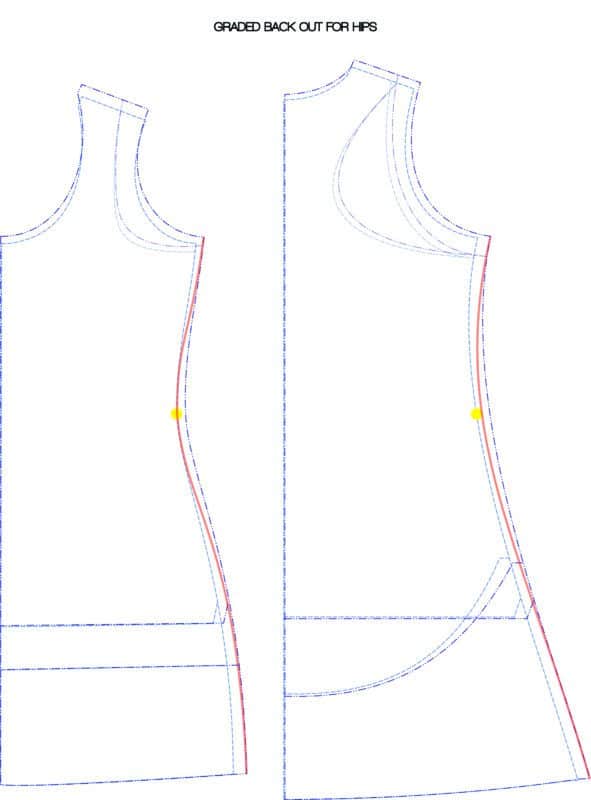
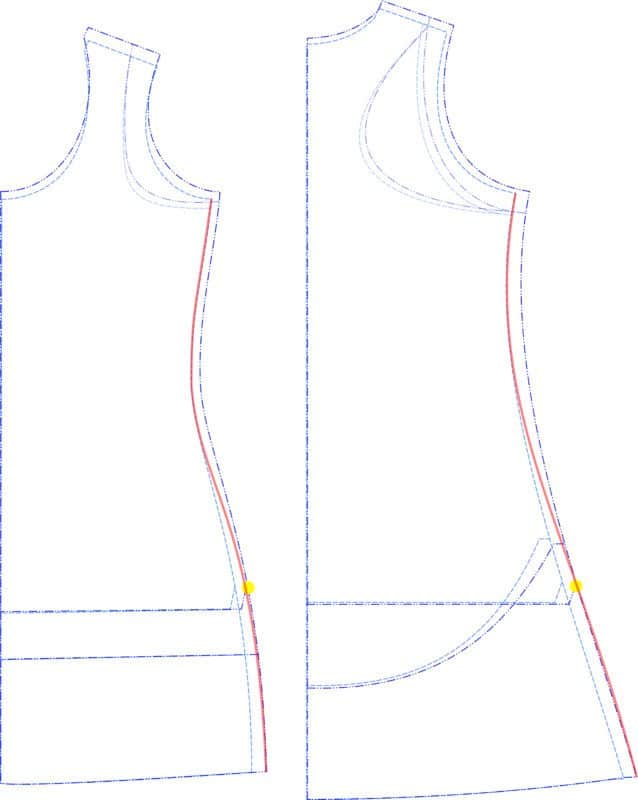
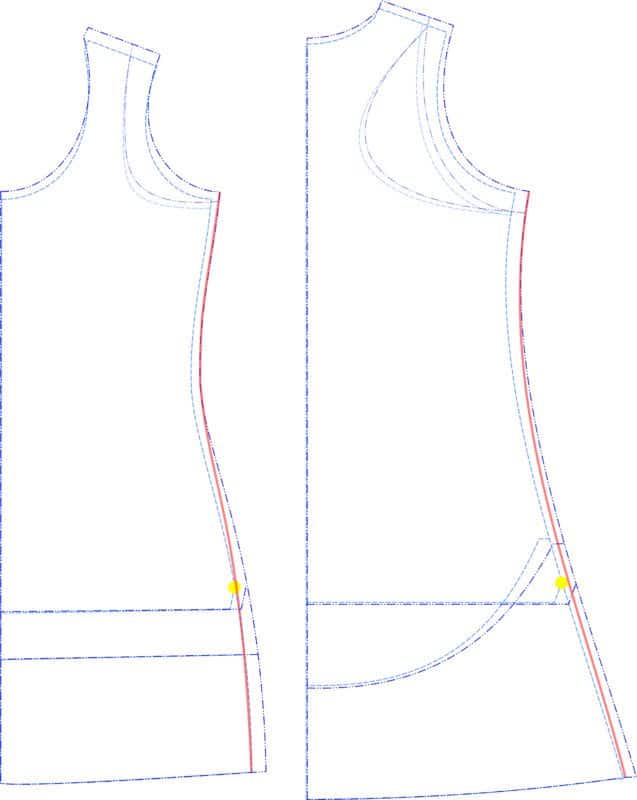
What if just your waist falls in the larger size, but your hips fall in the same size as your bust? Do you grade back in? The answer is, it depends on the pattern and your personal preference. For most tops and dresses, it’s not necessary to grade back in at the hips. Your garment will just fit a little looser than intended through the hips. If you would like to grade back in for the hips to keep the intended fit or for personal preference, the concept is the same. Just make sure your curve is smooth and gradual, and you don’t have a “bubble” at the side seam. The only time I do not recommend grading back in for the hips is if the pattern is A-line like Mya or Nina, or has a straight side seam like the skirt on Joy. See the image below – the side seam curves are not sharp and look natural, mirroring the original side seam of the pattern:
Grading for a Smaller Waist
The concept for grading in at the waist is exactly the same as grading out at the waist. See the examples below:
To grade in for the waist on a straight side seam, follow the same method as grading out.
Since we already draft to a curvy standard, it is very rare that anyone should have to grade in more than one size for their waist, unless they should require a FBA. In that case, the concept is the same as grading in just one size. What if your hips fall in a size bigger than your bust? Then it’s easy to grade back out to the larger size at the hip. See the images below for examples. Grading back out at the hips does work for patterns that are A-line but again, it is not recommended to do this with a pattern such as Joy that is cut straight down from the waist.
Grading for a Larger Hip
We’ve covered grading for the hips slightly above, but here are some examples of grading out for the hips. You want to keep the curves as smooth as possible, just as you do when grading out for the waist.
If the pattern has a straight side seam, you follow the exact same concept as grading out for the waist in the section above.
Grading for a Smaller Hip
Often it’s not necessary to grade in for the hips – the pattern will just fit a little more loose through the hip, as mentioned above. However, below are some examples of how to do so:
Again, it’s not recommended to grade in for the hips on a skirt such as Joy, which is intended to go straight down from the side seam.
Grading Shorts and Pants
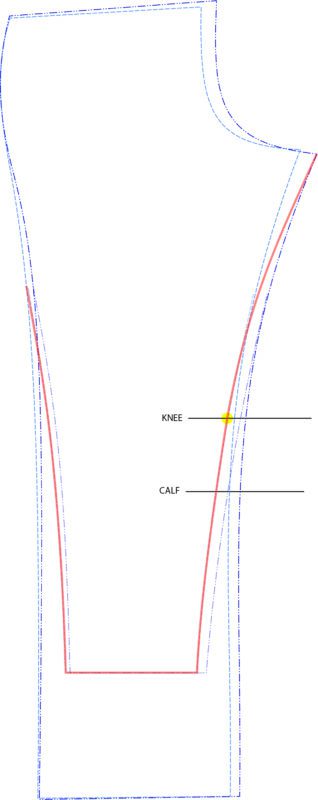
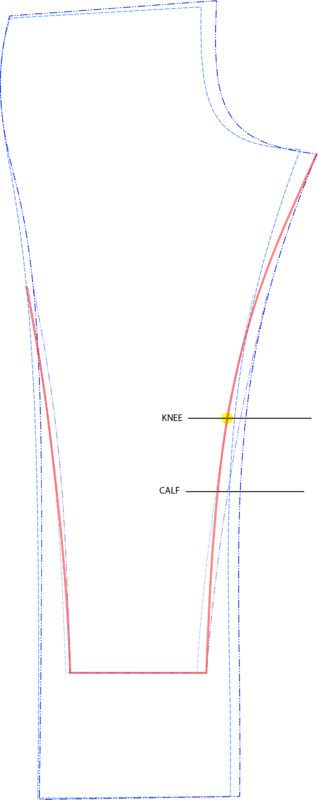
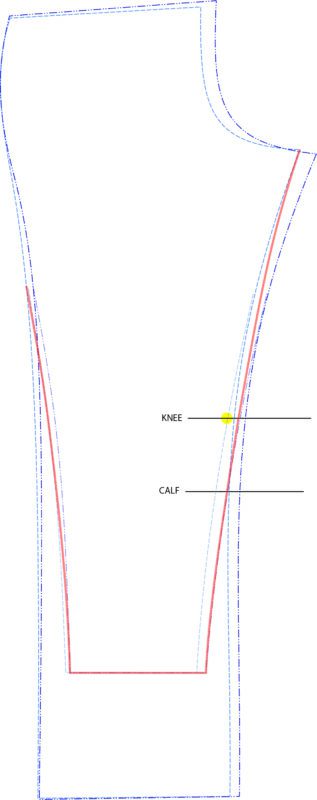
For our Bonny Leggings and Lexi Loungers, it is recommended to choose your size based on your full hip and use the waistband that corresponds to your waist measurement – you don’t necessarily need to grade out for the waist in those cases. Lexi does have the knee and calf marked on the pattern piece, with the drafted measurements included in the size chart to allow you to customize the fit to exactly your size. Below is an example of grading in at both the knee and calf on the jogger version.
Let’s say you were making the lounge pant version of the Lexi Loungers. It wouldn’t be necessary to grade in or out for the calf, since the pattern pieces naturally have a slight flare and significant ease towards the hem.
What if your knee measures a size smaller, but your calf measures bigger? You would follow the example below – notice that I am maintaining the same shape of the original seam of the pattern:
Finally, here is an example of grading out at the knee. It is not recommended to grade back in for the calf in this case – it would create a “bubble” along the seam.
WHEW! I know that was A LOT of information all at one time! However, we hope that this will be a comprehensive resource for all grading questions in the future! Have more questions? Don’t hesitate to ask in our Facebook Group!

Thanks for the great tutorial! Can you explain what you mean by 8″ side waist? It’s not a term I’m familiar with, and I couldn’t find anything more about it. Thanks!
Side waist is taken from your armpit vertically down to your natural waist. My sister has a visual here: https://www.patternsforpirates.com/measure-yourself/